

Contents of this page may be automatically translated, we take no responsibility for the accuracy of the translation. Feel free to contact our customer support centre if you have any questions.
This lesson gives students knowledge of maps and they get to know their surroundings with the help of a map. The lesson is designed for primary school years 1-3.
Use our services
Part 1 - Lesson on Maps
The lesson is based on the questions below. For each question, there is a section with a description and facts. Interact with the students by first asking the question and then following the description. Talk about maps, show different maps, and interact with the students.
- What is a map?
- What is a map used for?
- What can on a map?
- How do you make a map?
- How do you use a map?
This lesson also has an accompanying powerpoint slideshow with examples (in Swedish, ppt)
What is a map?
A map is a picture of reality seen from above. Give an explanatory description of the map, for example, "Imagine you're a bird and can see reality as a picture from above." Show an aerial photo of your schoolyard, see example in slide 1 of the PowerPoint presentation.
Do this:
- Open the Map tool and pan/zoom in to your schoolyard.
- Click on the symbol "Map Layers and Legend"

- 3. Select "Aerial photos and elevation data" and check "Orthophoto - color".
- 4. You can easily switch between the orthophoto and the map by unchecking and checking the "Orthophoto" map layer. You can also adjust the transparency of the orthophoto by dragging the dot "Change transparency" on the line under "Orthophoto".

It is possible to print the map or orthophoto by clicking on the "Print" tool, which creates a PDF that you can print.
Let the students look at the map and orthophoto and talk about what they see. Discuss with the students using the following questions:
- What types of maps are there?
- What maps have you come across? For example, in a game, on your phone, in a navigation system/GPS in a car, or on a paper map, in an atlas, on a globe, or for orienteering.
What is a map used for?
Let the students have an open discussion. A map is created based on its purpose, such as how to get from one place to another (road map), or finding your way to a place (address) or for planning something to build (a house). See examples in the PowerPoint presentation.
What can you have on a map?
Let the students have an open discussion. Since a map is created based on its purpose, in addition to the most common things like houses and roads, someone may want a map that only shows restaurants or all the beaches and bike paths. Or a treasure, then it becomes a treasure map!
To illustrate what can be on maps, show pictures 3-6 in the PowerPoint presentation. From pictures 4-6, there is a short story about how to plan a trip based on maps (check the weather, train connections, find the elk). Here, you can also show a paper map with any content.
How do you make a map?
Many times, a map is based on an aerial photo to draw a map. Show an aerial photo, see example in slide 1. Show a map of the same area, see example in slide 2. The map contains both text and symbols.
How do you use a map?
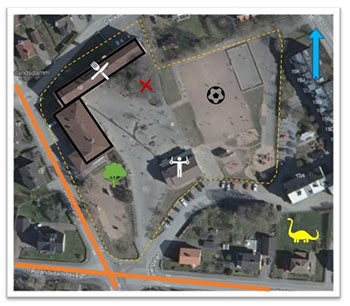
To use the map, the students need to know that north is always up on a map, often shown with an arrow pointing upwards, a north arrow. The students can also use a compass to turn the map towards the north.
Part 2 - Draw a map of the schoolyard
Discuss with the students what a map of the schoolyard can be used for? Are there roads, bike/walking paths, gates, swings, football field, cafeteria, principal's office, trash cans, lawn, trees, etc.? What can be drawn and what can be written?
Assign the students the task of drawing a map with a few items found on the schoolyard, including an arrow pointing north. Use an aerial image from the Geoskolan mapping tool, zoom in to your school - to draw on the schoolyard.
Part 3 - Go out into the schoolyard and use the map
Do some simple tasks with the maps outside on the schoolyard. Adapt the tasks according to the amount of time you have. The students bring their maps and a red pen each. Gather in the schoolyard and hand out the first task, then proceed with the others.
a) Where is north when standing in the schoolyard? Show north with the compass so that the students can orient their maps correctly.
b) Create a Treasure Map. Pretend that you have hidden a treasure in the schoolyard. The students go to their hiding spot on the schoolyard and draw a red X on that location on the map.
c) Find the cafeteria, the gymnasium, trees, or other places using the map.
d) Compare how things look on the map and in reality, such as the cafeteria, the gymnasium, trees, or other places.