Contents of this page may be automatically translated, we take no responsibility for the accuracy of the translation. Feel free to contact our customer support centre if you have any questions.
This search service - which is open to everyone - provides the opportunity to search for information about aerial photographs and orthophotos.
Overview - panels, tools and buttons
Panels
GeoLex can be used in different modes. It can be a map on the entire screen, a map on the half screen and with panels for different functions or panels over the entire screen. Panel mode is automatically saved as a user setting.
![]() Panels open with this icon located at the top of the menu bar on the left of the screen.
Panels open with this icon located at the top of the menu bar on the left of the screen.
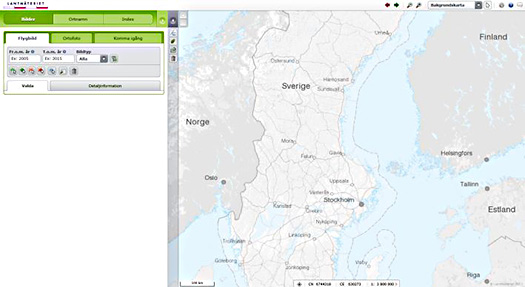
Example of a map of the entire screen, with all panels closed.
Press the button that opens the panels once and you will get the following position with half the area with the map and the rest to any panel.
Close a panel by clicking on ![]()
The toolbar above the map
The toolbar above the map has a number of functions in buttons and menus.
![]()
![]() Back to previous map extension.
Back to previous map extension.
![]() Forward to map extension before reversing.
Forward to map extension before reversing.
![]() Zoom out. Click once or hold down the left mouse button and drag a box.
Zoom out. Click once or hold down the left mouse button and drag a box.
![]() Zoom in. Click once or hold down the left mouse button and drag a box.
Zoom in. Click once or hold down the left mouse button and drag a box.
![]() Map Selection Menu.
Map Selection Menu.
![]() Displays active tool, arrow shows that it is possible to pan.
Displays active tool, arrow shows that it is possible to pan.
![]() Here Zoom is active and then it is not possible to pan.
Here Zoom is active and then it is not possible to pan.
![]() Here are Map and Index settings, for example to set a selection on the map for a searched position.
Here are Map and Index settings, for example to set a selection on the map for a searched position.
![]() Help
Help
![]() Leave comments . Here you can leave comments on the program.
Leave comments . Here you can leave comments on the program.
Toolbar to the left of the map
![]() Measure with line . Finish with a double click. The measurement remains until a new measurement begins.
Measure with line . Finish with a double click. The measurement remains until a new measurement begins.
![]() Map Selector - select, organize and set transparency for maps and images .
Map Selector - select, organize and set transparency for maps and images .
![]() Link , link to map section in GeoLex.
Link , link to map section in GeoLex.
![]() Trash - clear selected information.
Trash - clear selected information.
![]() Images - search and view information about aerial images and orthophotos.
Images - search and view information about aerial images and orthophotos.
![]() Place names - search and show in the map.
Place names - search and show in the map.
![]() Index - search and display index boxes and map sheets.
Index - search and display index boxes and map sheets.
The coordinate window below the map

The top row shows the map coordinates and approximate scale.
By clicking on ![]() the user's geographical position can be displayed. The accuracy of the position depends on whether the computer, phone, etc. is able to position with satellite positioning or is connected to wifi.
the user's geographical position can be displayed. The accuracy of the position depends on whether the computer, phone, etc. is able to position with satellite positioning or is connected to wifi.
By mark the fields for CN, CE the coordinate can be entered and then the image is moved to the searched point.
Under settings ![]() it is possible to choose that a mark
it is possible to choose that a mark ![]() is displayed in the point.
is displayed in the point.
Scale can be set in the field for the scale factor. Note that the scale depends on the screen resolution which makes it difficult to compare scale but someone who has a different resolution on their screen.
The bottom line indicates which reference system the image is displayed in, currently only SWEREF 99 TM is available. shows the position of the mouse pointer and finally the coordinates for the distribution of the map. .
Background map
Background map is a grayscale version of Topographic web map.
Zoom in when searching for information about aerial images - it also shows the pixel and year for each aerial image .
Orthophoto
Orthophoto is a Sweden overview that shows the latest orthophoto.

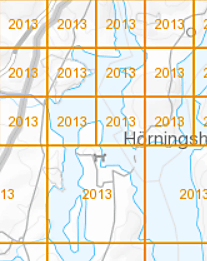
Latest orthophoto years
Latest orthophoto years is a division that shows aerial photography years for the most recent orthophoto. 5 km squares means that the resolution is 0 , 5 m and for 2.5 km squares it is 0.25 m per pixel.
Aerial photos from 2003 to the present
Aerial photos from 2003 to the present, in 1960-2002 and the oldest from the year 1929-1959 , displays pixels colored by image type (for example, analog color).
The following colors are used:

Zoom in and the aerial photography year for the pixel is also displayed.
This year's orthophoto
This year's orthophoto shows the current year's outcome.
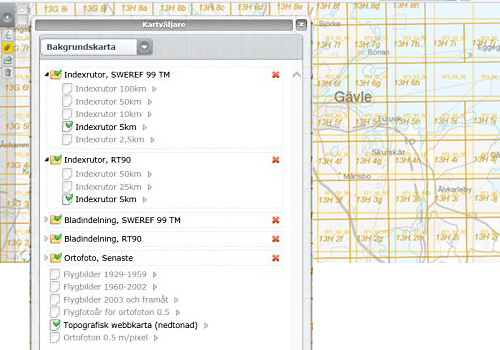
Map Selector
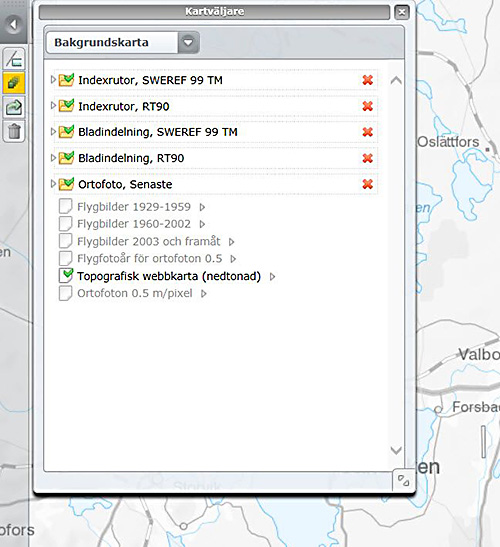
![]() The Map Selector contains all the maps you can use in GeoLex. The maps are available as layers or groups, where a group consists of more than one layer.
The Map Selector contains all the maps you can use in GeoLex. The maps are available as layers or groups, where a group consists of more than one layer.
![]() Group, consists of several layers, can be opened and then all layers are displayed.
Group, consists of several layers, can be opened and then all layers are displayed.
![]() Layer
Layer
![]() Click the arrow to display layers.
Click the arrow to display layers.
![]() Click on the arrow to hide layers.
Click on the arrow to hide layers.
Both layers and groups can be turned on and off and if they are grayed out they are off. groups can also be moved by dragging and dropping.When moving a layer or group, be aware that a beige-yellow mark will appear in the map selector where your layer or group will be placed. A group can not be moved into another group.
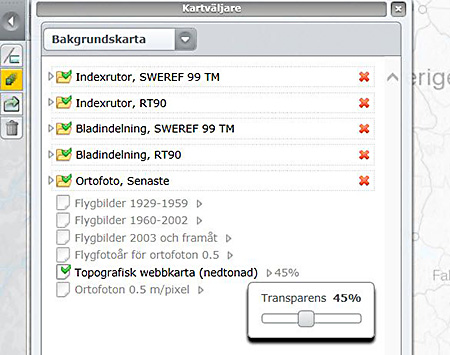
Transparency of a layer can be changed by clicking on ![]() and set the level of a slide bar.
and set the level of a slide bar.
Searching for aerial photography information
To search and manage the information about the aerial photography you are interested in, you can use different tools.
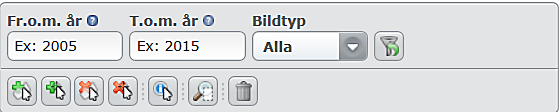
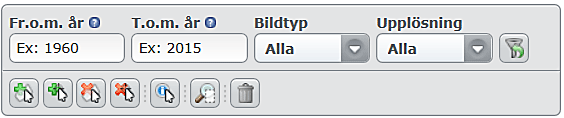
You can search for aerial photos from a specific year or within an interval. .
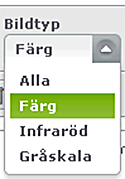
You can also select the image type you want to search for.
![]() Here you reset all search conditions (filters).
Here you reset all search conditions (filters).
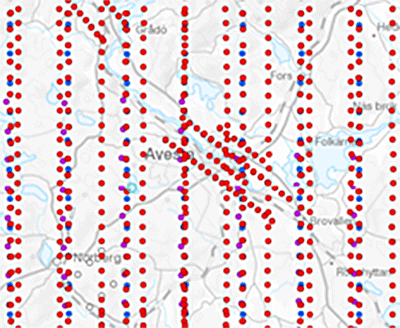
To decide in which area you want to search in the map, use the tools Add with area or Add with a dot to define the search area, using the Remove with dot and Delete with dot tools through the map, remove the selection.
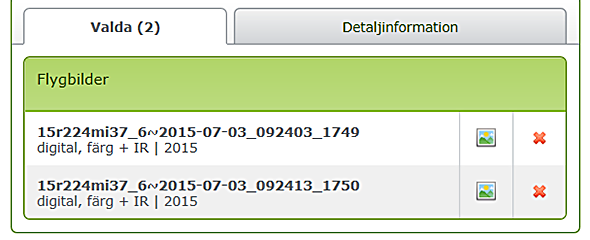
By using the search criteria, you make a selection that appears in the list in the Selected tab.
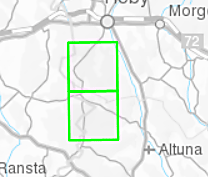
On the map, the points are marked in cyan.
If you want to see where on the map the images are, use Zoom to selected ![]() .
.
By clicking on ![]() the selected image is previewed as a low-resolution thumbnail in a new window. Multiple images can be displayed simultaneously in different windows.
the selected image is previewed as a low-resolution thumbnail in a new window. Multiple images can be displayed simultaneously in different windows.
Note> Because the image is displayed in a so-called Pop-up window, your browser must not be set to Blocking Pop-up windows, see browser tool settings.
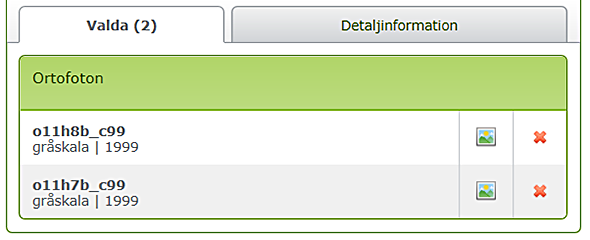
Here you can remove from the list by clicking on the red cross. If you want to clear the list completely, use Clear selected aerial images ![]() .
.
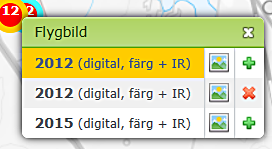
In the Detailed Information tab you will see more information about the aerial image. Tap with the tool Show aerial image information ![]() to select the pixel you want to know more about. A hit list is displayed with the pixels that the tool found.
to select the pixel you want to know more about. A hit list is displayed with the pixels that the tool found.
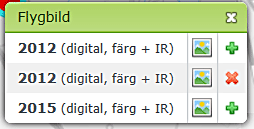
Three dots were found in the example. The ones with green plus signs ( Add ) did not previously appear in Selected but can add here, and the one with a red cross ( Delete ) is in Selected but can be deleted here, select the item you want to display in the list more information about how the object is highlighted in yellow in the map and in the list.
By clicking on ![]() Selected image is previewed as a low resolution thumbnail in a new window. Multiple images can be displayed simultaneously in different windows. For some images, thumbnails are missing.
Selected image is previewed as a low resolution thumbnail in a new window. Multiple images can be displayed simultaneously in different windows. For some images, thumbnails are missing.
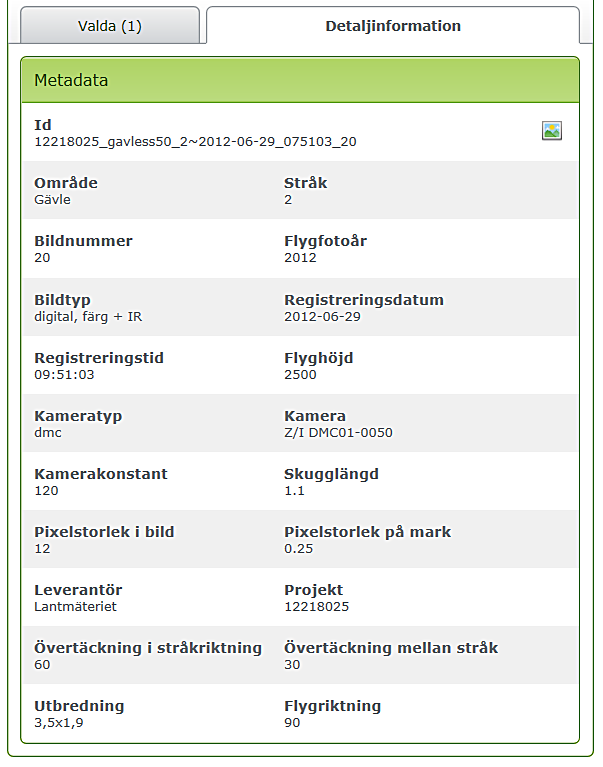
In the Details tab the following is displayed:
By clicking on ![]() the selected image is previewed as a low resolution thumbnail in a new window. Multiple images can be displayed simultaneously in different windows. For some images thumbnails are missing.
the selected image is previewed as a low resolution thumbnail in a new window. Multiple images can be displayed simultaneously in different windows. For some images thumbnails are missing.
Search for information about orthophotos
All orthophotos that are stored digitally are searchable in the service with information about distribution, image type (b / w, IR or color) and aerial photo years. Older orthophotos that lack that information are based on altitude data 50 m grid.
To search and manage the information about the orthophotos you are interested in, you can use various tools.
You can search for orthophotos from a certain year or within an interval. current year end year.
|
You can also select the image type
|
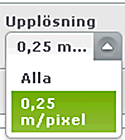
Or if you just want to search for orthophotos with 0.25 meters resolution
|
![]() Here you reset all search criteria (filters).
Here you reset all search criteria (filters).
To decide in which area you want to search, you can define the search area with the tools:
![]() Add with surface
Add with surface
![]() Add with period
Add with period
To delete choices you have made in the map, you can use the tools:
![]() Remove with surface
Remove with surface
![]() Delete with period
Delete with period
Using the search criteria, make a selection that appears in the list in the Selected tab On the map, the distribution of the selected orthophoto is marked in green.
If you want to see where on the map the images are, use Zoom to selected ![]() .
.
By clicking on ![]() f preview the selected image as a low-resolution thumbnail in a new window. Multiple images can be displayed simultaneously in different windows.
f preview the selected image as a low-resolution thumbnail in a new window. Multiple images can be displayed simultaneously in different windows. ![]() Since the image is displayed in a so-called Pop-up window, your browser must not be set to Blocking Pop-up windows, see the browser's tool settings.
Since the image is displayed in a so-called Pop-up window, your browser must not be set to Blocking Pop-up windows, see the browser's tool settings.
Here you can remove from the list by clicking on the red cross. If you want to clear the list completely, use Clear selected orthophotos ![]() .
.
In the Detailed Information tab you will see more information about orthophotos. Tap with the tool Show information about orthophotos ![]() to select the image you want to know more about. A hit list is displayed with the orthophotos that the tool found.
to select the image you want to know more about. A hit list is displayed with the orthophotos that the tool found.
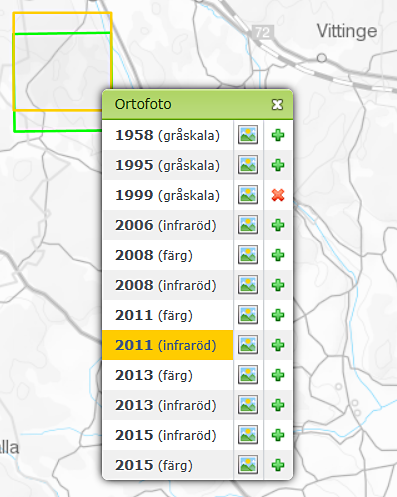
In the example below were found twelve orthophotos, the ones with green plus signs ( Add ) were not previously in Selected but can add here, and the one with a red cross ( Remove ) is in Selected but can be removed here.Select in the list the image you want to show more information about and it will be highlighted in yellow in the map and in the list.Only one item at a time can display detailed information about.The selection on the map and the information in the tab remains until another object is selected.
Search and view place names on the map
![]() Place names can search using a number of search conditions.
Place names can search using a number of search conditions.
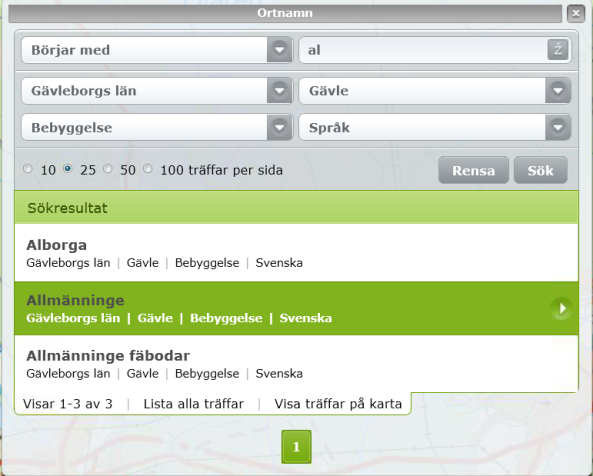
The first condition is if the place name is specified in the search or if it is a free text search of some kind (starts with, exactly etc.). County is selected in the list and is a mandatory information that must be entered before the municipality. Municipality can be omitted or selected in the list. Language and name type are not mandatory search conditions.
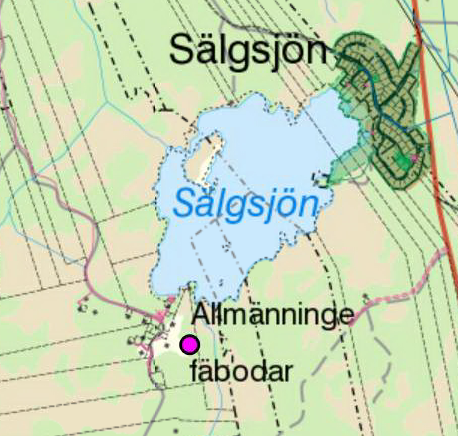
Example of a search.
Click on a line and the image will be panned to the place of the name.
The place is marked with a green map pin ![]()
Remove the map pin by clicking on the line again.
List all hits - copied or printed.
Show all hits on map - zooms to all place names in the list and they are reported with a round ring with magenta filling.
-----------
Enter the place name or location you want to search for in Click the 'Search' button or press return on the keyboard.
Enter your keyword and select one of the options 'Begins with', 'Exact', 'Contains' or 'Ends with'. on the 'Search' button or press return on the keyboard. On small screens such as mobiles, select the box "Refine the search" to display the refinement options. the word 'hult'.
- Enter hult in the input field
- Select the option 'Ends with'>
- Click on the 'Search' button or press return on the keyboard.
It is also possible to search with Sami characters.
You can limit a search to the following based on county, municipality, language and name type. County must be selected before the municipality can be selected Language and name type can be selected independently.
When you click the 'Search' button or press return keyboard, the search result is displayed as a list directly below the input field and the search controls.
If your search contains more hits than can fit on the screen, these hits are displayed by clicking on the links that appear below the hit list.
Click in the hit list to select a place or place. The selected city or place is then shown in the map.
Change city or place by clicking in the hit list. The map is updated so that the geographical location of the place or place is marked.
Search index boxes and map sheets
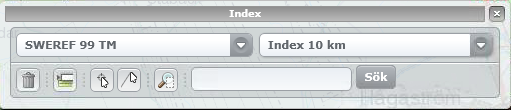
![]() The search criteria for index boxes and map sheets are; Coordinate systems and map series or division into index boxes.
The search criteria for index boxes and map sheets are; Coordinate systems and map series or division into index boxes.
Search can be done on blade code or with geometry.
![]() Remove selected from list.
Remove selected from list.
![]() Add to list.
Add to list.
![]() Search by dot.
Search by dot.
![]() Search by line.
Search by line.
![]() Zoom to all selected. Zoom to a sheet or box - click on the row in the list.
Zoom to all selected. Zoom to a sheet or box - click on the row in the list.
Show index boxes and map sheets
![]() The Map Selector contains all the maps you can use in GeoLex. The maps are available as layers or groups, where a group consists of more than one layer.
The Map Selector contains all the maps you can use in GeoLex. The maps are available as layers or groups, where a group consists of more than one layer.
Index boxes and page layout can be displayed either in the SWEREF 99 TM coordinate system or in RT90.
For help and tips on the Map Selector above , more information on how to handle the different groups and layers.

The following example shows a dimmed background map, index boxes, SWEREF 99 TM, 5 km and index boxes, RT90 5 km. allows you to see the difference in the routing between the different coordinate systems.